 Pin It
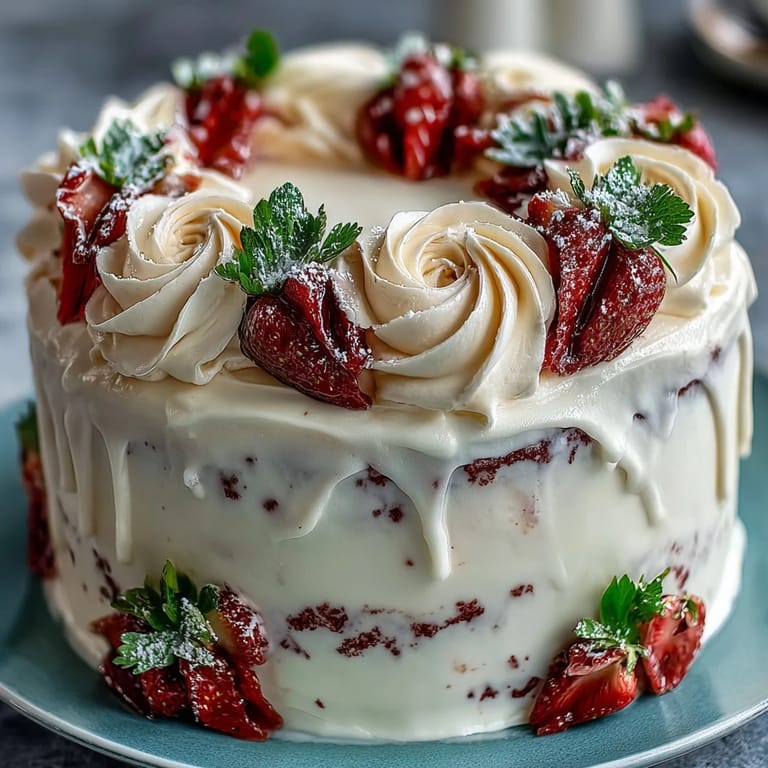
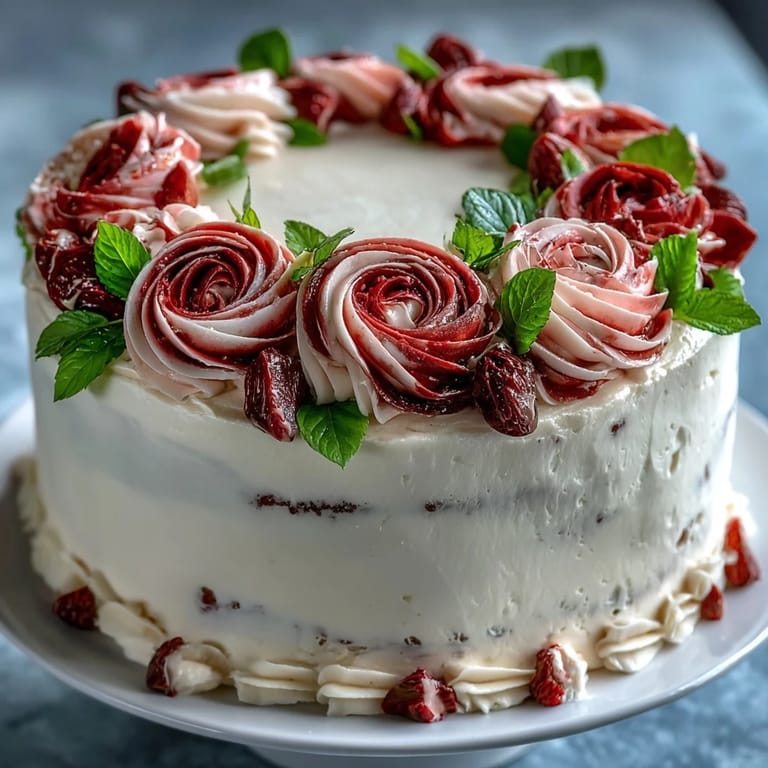
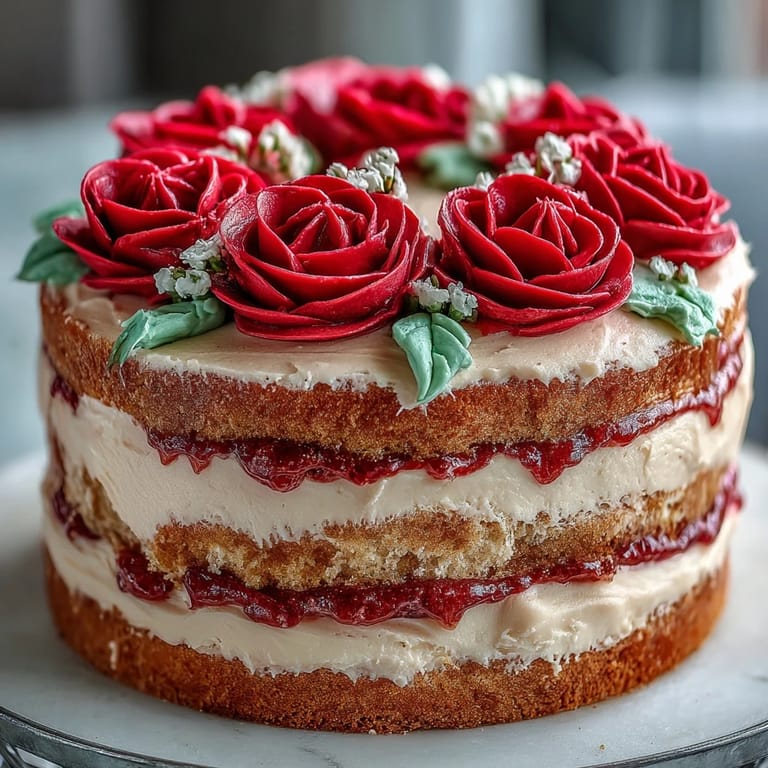
 There's something about a graduation cake that feels different from all the other cakes you'll bake. Maybe it's because you're not just making dessert—you're creating the centerpiece of someone's proud moment. I stood in my kitchen on a warm May afternoon, butter softening on the counter, thinking about how my neighbor's daughter was finally walking across that stage. That's when I decided this cake needed to be special, layered with buttery vanilla sponge and topped with roses piped in colors that matched her school colors. It took practice, a few lopsided attempts, and one genuinely terrible first try, but once I nailed it, I understood why people save these cakes for the celebrations that actually matter.
I'll never forget watching my friend's mom cut into the cake at their graduation party, and how the room kind of quieted down because everyone wanted to see those roses tumble onto the plate. Someone said it looked like something from a bakery, and I felt this ridiculous pride over buttercream. That's when I realized the magic wasn't just in how it tasted—it was in how it made people pause and actually appreciate the moment before diving in.
Ingredients
- All-purpose flour (3 cups / 375 g): The foundation of your cake's tender crumb; don't sift unless you're being extra precise, but do measure by weight if you have a scale because it's more reliable than cups.
- Baking powder (2½ tsp) and baking soda (½ tsp): These two work together to give you that light, airy texture that makes people ask for seconds; they're not interchangeable, so don't skip either one.
- Salt (½ tsp): Sounds small but it wakes up all the vanilla flavors and keeps the cake from tasting flat.
- Unsalted butter (1 cup / 225 g for cake, 1½ cups / 340 g for buttercream): Room temperature is non-negotiable here; cold butter won't cream properly and you'll end up with a dense cake instead of the fluffy one you're after.
- Granulated sugar (2 cups / 400 g): This creams with the butter to trap air bubbles that make your cake light and tender.
- Large eggs (4), room temperature: Cold eggs won't incorporate smoothly into the batter, so pull them out of the fridge while you're prepping everything else.
- Vanilla extract (1 tbsp for cake, 2 tsp for buttercream): The real stuff makes a difference you can actually taste; don't use imitation and expect the same magic.
- Whole milk (1¼ cups / 300 ml for cake, ¼ cup / 60 ml for buttercream), room temperature: Cold milk can cause the batter to seize up, so let it sit out while you're mixing.
- Powdered sugar (6 cups / 720 g), sifted: Sifting sounds like busywork until you try to beat lumpy powdered sugar into butter and realize you're creating a sad, grainy frosting instead of silk.
- Gel food coloring (assorted): Gel is worth the hunt because it's concentrated, vibrant, and won't thin out your buttercream the way liquid coloring does; I learned this the hard way with a pink disaster that looked more like frosted salmon.
Tired of Takeout? 🥡
Get 10 meals you can make faster than delivery arrives. Seriously.
One email. No spam. Unsubscribe anytime.
Instructions
- Prepare your pan and preheat:
- Set your oven to 350°F (175°C) and grease that 12x18-inch sheet pan thoroughly, then line it with parchment paper so your cake slides out clean. Having everything ready before you start mixing is the difference between calm baking and realizing you're scrambling while your batter sits waiting.
- Mix your dry ingredients:
- Whisk together the flour, baking powder, baking soda, and salt in a medium bowl, making sure everything is evenly distributed. This step prevents pockets of baking soda from creating those weird alkaline-tasting spots in your finished cake.
- Cream butter and sugar:
- In a large bowl, beat the softened butter and sugar together for about 3-4 minutes until the mixture looks pale, fluffy, and almost like wet sand. You're incorporating air here, which is what makes this cake rise beautifully instead of baking into a dense brick.
- Add eggs one by one:
- Drop in an egg, beat it in completely, then add the next one and repeat until all four are incorporated and the mixture looks creamy and smooth. Rushing through this and tossing all the eggs in at once means they won't emulsify properly, and you'll notice a grainy texture in your finished cake.
- Mix in the vanilla:
- Stir in your vanilla extract and let the mixer run for a few more seconds to make sure it's evenly distributed throughout.
- Alternate flour and milk:
- Starting with a portion of your flour mixture, add about a third of it to the butter mixture and beat until just combined, then add about half the milk, then more flour, then the remaining milk, and finish with the last bit of flour. Always begin and end with flour to keep the batter from becoming too thin, and stop mixing as soon as you don't see streaks of flour—overmixing creates a tough, dense cake.
- Bake:
- Pour the batter into your prepared pan, smooth the top with an offset spatula so it bakes evenly, and slide it into the preheated oven. Bake for 30-35 minutes until a toothpick inserted in the center comes out clean or with just a few crumbs, which takes longer than you think it will but is worth the wait.
- Cool completely:
- Let the cake cool in the pan on a wire rack for about 15 minutes, then turn it out onto the rack if you want, or leave it in the pan—either way, don't frost it until it's completely cool or your buttercream will slide right off.
- Make your buttercream:
- Beat the softened butter until it's creamy and pale, about 2 minutes, then gradually add your sifted powdered sugar while the mixer is running, stopping occasionally to scrape down the bowl. Once all the sugar is incorporated and there are no lumps, add the milk and vanilla and beat for another 5 minutes until the whole thing transforms into silky, spreadable frosting.
- Divide and color:
- Scoop the buttercream into separate bowls and add gel food coloring to each portion—a tiny dab of pink for roses, a bit more red if you want deeper ones, yellow for variety, and green for leaves, leaving some plain white for your base coat. Gel coloring requires just a toothpick or small spoon to add, so start small and mix thoroughly before adding more.
- Apply your base coat:
- Spread a thin, even layer of white buttercream all over the cooled cake using an offset spatula, which gives you a smooth canvas for piping. This base coat is forgiving—it doesn't need to be perfect because you're covering it with roses.
- Pipe your roses and leaves:
- Fit piping bags with your petal tip for roses and leaf tip for leaves, fill them with the appropriate colored buttercream, and start piping onto the cake, clustering them in the corners or along the borders. If your first few roses look wonky, that's completely normal; they get easier after three or four attempts, and by the time you're done, even the early awkward ones will look intentional when they're all together.
- Add your message:
- Switch to a small round piping tip, fill a fresh piping bag with white buttercream, and pipe your congratulations message or personalized text across the cake where you have space. You can also freehand with a small offset spatula and a tiny bowl of buttercream if piping feels too intimidating.
 Pin It
 There's a specific moment that happens at every graduation celebration when someone takes that first bite of cake in front of everyone else, and their face does this thing where you can see them genuinely tasting it instead of just eating. That's the moment this cake earns its place at the table.
Why Piped Roses Matter More Than You Think
People spend so much time worrying about making perfect piped roses that they miss why they're actually worth learning. A smooth frosted cake is fine, but a cake with roses tells someone that you cared enough to practice, to watch tutorials, to ruin a batch or two before getting it right. It transforms a dessert into a keepsake moment, the kind of thing people photograph and share because it feels special.
Timing and Preparation Strategy
The smartest move I made was baking the cake the day before the party and storing it covered at room temperature, then making the buttercream fresh the morning of and decorating a few hours before guests arrived. This schedule gave me time to relax instead of rushing through piping while stressed, and the cake actually tasted better because it had time to settle and absorb its own flavors. You can also freeze the baked cake for up to a month, which means you can plan ahead if you know a graduation is coming.
Variations and Personalization Ideas
If you want to shift away from vanilla, the chocolate variation is genuinely excellent—just swap ¾ cup of the flour for ¾ cup unsweetened cocoa powder and follow everything else exactly the same. You could also add almond extract instead of all vanilla for something slightly different, or tint your white buttercream in the graduate's school colors, or pipe their initials instead of a generic message. The foundation of this cake is flexible enough that you can make it feel personal without compromising how it turns out.
- A chocolate cake with white buttercream roses looks incredibly sophisticated and photographs beautifully.
- If you're nervous about piping, you can also create a simpler design with swirls and scattered sprinkles, which honestly looks just as nice and requires less precision.
- Store leftovers covered at room temperature for up to two days, or refrigerate for up to five days, and the cake will stay moist and delicious the whole time.
 Pin It
 A graduation cake is one of those rare desserts that bridges the practical and the meaningful, the homemade and the impressive. Make it, share it, and watch it become part of someone's memory of their big day.
Recipe Q&A
- → How do I achieve moistness in the cake?
Use room temperature butter and eggs, and alternate adding the flour mixture with milk to create a tender, moist crumb.
- → What is the best way to tint the buttercream for roses?
Gel food coloring works well, offering vibrant colors without making the buttercream runny.
- → Can I prepare the cake in advance?
Yes, the cake can be baked ahead and stored covered at room temperature for up to 2 days, or refrigerated up to 5 days before decorating.
- → How should I pipe the buttercream roses?
Use a petal piping tip and steady pressure to form layered petals, rotating the bag as you pipe for realistic blooms.
- → Are there any suggested flavor variations?
Substituting some flour with cocoa powder creates a rich chocolate variant, adding depth to the vanilla base.