 Pin It
 I discovered these cookies by accident on my phone at midnight, scrolling through videos I shouldn't have been watching before bed. The combination seemed wild at first—brown butter, which I'd mastered years ago, paired with white miso paste, which felt like bringing my favorite Japanese ingredient into American cookie territory. But something about the viral simplicity of it made me want to prove it worked, so I found myself browning butter at 1 AM just to see what the fuss was about. The nutty aroma filled my kitchen, and by the time I folded in that umami-rich miso, I knew I was onto something special. These cookies became my midnight answer to every craving I couldn't quite name.
I baked a batch for my neighbor who'd been stressed about a work presentation, and she came back an hour later saying they made her afternoon feel manageable. She called them my "fancy cookies," which made me laugh because they're deceptively simple. That moment reminded me that the best recipes are the ones that slip into someone's day and make it a little softer.
Ingredients
- Unsalted butter (1 cup): Browning butter is where the magic happens—those deep golden bits at the bottom create a nutty richness that regular melted butter can't touch, and cooling it slightly prevents the sugar from scrambling.
- Light and granulated sugar (1 1/2 cups combined): The mix of brown and white sugar gives you moisture and structure at the same time, preventing that thin, crispy cookie situation unless you want it.
- Eggs and vanilla (2 large, room temperature, plus 2 teaspoons vanilla): Room temperature eggs blend smoother with the sugar, creating that glossy texture that signals you're on the right track.
- White miso paste (3 tablespoons): This is the non-negotiable game changer—it adds umami depth and a subtle sweetness that makes people wonder if you added something they can't identify.
- All-purpose flour (2 1/4 cups): The flour carries everything else, so don't pack it when measuring or you'll end up with dense cookies that feel wrong.
- Baking soda and baking powder (1 teaspoon and 1/2 teaspoon): The combination gives you lift and spread in all the right ways, creating that perfect textural contrast.
- Fine sea salt (1/2 teaspoon): This in the dough balances the sweetness and lets the miso shine without making the cookies taste salty.
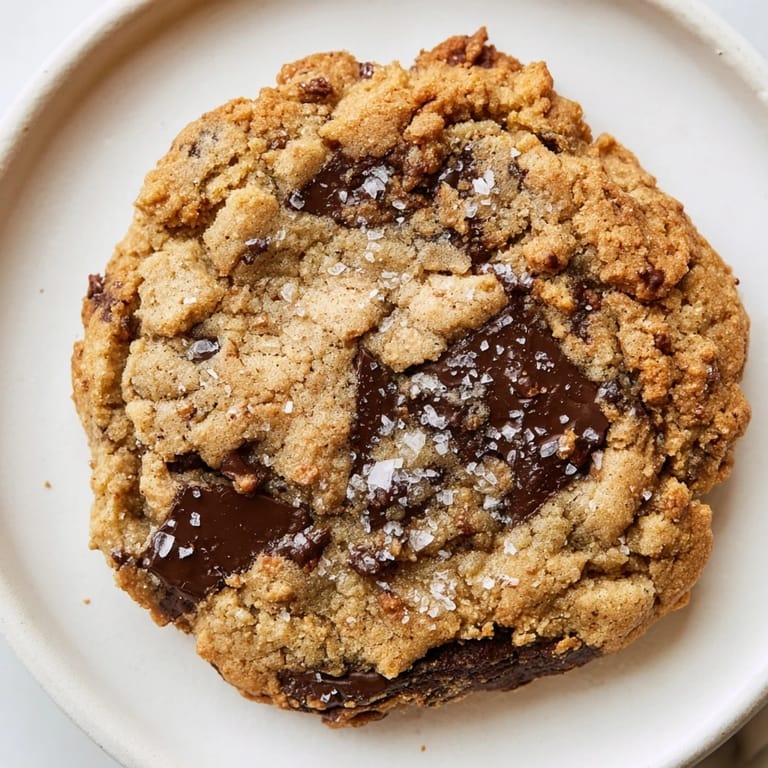
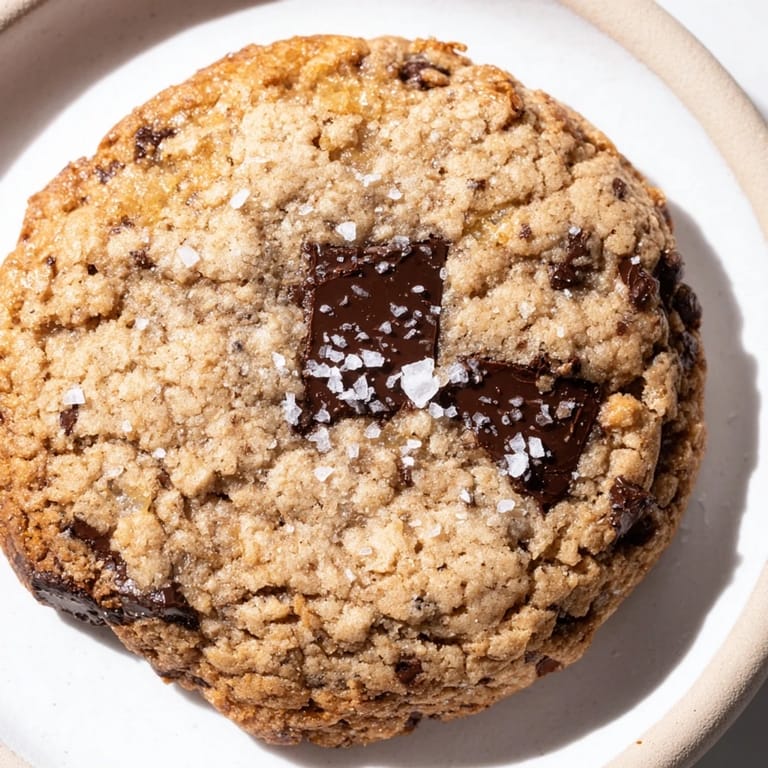
- Dark or semisweet chocolate chips (1 1/4 cups): Go for quality chips or chop up a good chocolate bar—they should melt into pockets rather than disappear entirely.
- Flaky sea salt (optional topping): Maldon salt is the move here, adding crunch and a finishing-touch sophistication that makes people think you're more professional than you are.
Tired of Takeout? 🥡
Get 10 meals you can make faster than delivery arrives. Seriously.
One email. No spam. Unsubscribe anytime.
Instructions
- Brown your butter like you mean it:
- Melt the butter in a medium saucepan over medium heat and let it bubble away, swirling every minute or so. Watch for the milk solids to sink and turn golden brown—this takes about 5 to 7 minutes, but don't rush it or you'll miss the sweet spot between nutty and burned. Pour it into a bowl and let it cool for 10 minutes so the butter doesn't cook your sugar.
- Whisk in the sweetness and soul:
- Once the brown butter is cool enough to touch, add your sugars and white miso paste to the same bowl and whisk until everything dissolves into a smooth, caramel-colored mixture. This is where the magic starts—you're creating a base that tastes both familiar and surprising.
- Build your wet mixture:
- Crack in your room-temperature eggs and vanilla extract, then whisk until the mixture turns glossy and thickens slightly, which takes about 2 minutes of steady whisking. This step aerates everything, setting you up for cookies with the right texture.
- Combine your dry ingredients separately:
- In a separate bowl, whisk together flour, baking soda, baking powder, and salt until everything's evenly distributed. This prevents pockets of baking soda that taste metallic and ensures your cookies rise consistently.
- Fold the dry into the wet gently:
- Use a spatula to fold the flour mixture into the egg mixture slowly, making sure not to overmix—you're looking for just combined, with maybe a few streaks of flour still visible. Overmixing develops gluten, which turns your cookies tough and chewy in the wrong way.
- Add the chocolate:
- Fold in your chocolate chips until they're distributed throughout, then cover the dough and refrigerate for at least 30 minutes. Overnight chilling is even better because it lets the flavors get to know each other.
- Preheat and prepare your baking station:
- Heat your oven to 350°F and line two baking sheets with parchment paper while the dough chills. This prevents last-minute scrambling and lets you work quickly once you start scooping.
- Scoop and space carefully:
- Using a 2-tablespoon scoop or a spoon, form balls and place them 2 inches apart on your prepared sheets—they need room to spread without touching. If you don't have a scoop, two spoons and patience work just fine.
- Bake until the edges say yes:
- Bake for 11 to 13 minutes, watching for the edges to turn golden while the centers still look slightly underbaked and soft. They'll continue cooking on the hot pan after you pull them out, so trust the timing even if they look a little pale in the middle.
- Finish with salt and cool with intention:
- Sprinkle flaky salt over the warm cookies immediately after removing them from the oven, then let them rest on the baking sheet for 5 minutes before transferring to a wire rack. This resting time lets them set just enough to move without falling apart but not so long that they harden completely.
 Pin It
 The first time someone bit into one of these and their eyes widened—that moment when they realized a cookie could taste this complex and effortless—made me understand why food matters. These cookies became the reason my kitchen always smells like something good is about to happen.
The Science of Brown Butter Magic
Brown butter isn't just melted butter with attitude; it's butter that's been heated long enough for the milk solids to caramelize, creating new flavors that regular butter simply can't offer. Those tiny brown particles at the bottom of the pan are where all the nutty, almost toasted complexity lives, and when you incorporate them into cookie dough, they transform the entire flavor profile. I learned this the hard way by straining out the solids my first time, thinking I was being fancy, and ended up with cookies that tasted disappointingly ordinary. The miso loves these brown bits, actually, leaning into that toasted umami quality and creating a flavor combination that feels way more intentional than it actually is.
Texture Secrets Nobody Talks About
The secret to cookies that are crispy on the edges but chewy in the center isn't a temperature trick or a timing hack—it's about respecting the dough's rest period and pulling the cookies from the oven at the exact moment they look almost underbaked. I used to bake until they looked completely set, which gave me uniform cookies that were just okay, all the same texture throughout. Now I watch for the edges to be golden and the centers to jiggle slightly when I remove them, trusting that they'll continue cooking on the hot pan. The 5-minute rest on the baking sheet is crucial too; it's the difference between cookies that hold their shape and cookies that fall apart when you pick them up. Room-temperature dough also spreads differently than cold dough, which is why chilling makes such a difference in the final texture.
When Things Go Slightly Wrong
I've made these cookies at least thirty times now, and I've discovered that half the mishaps are actually fixable or preventable with small adjustments. If your brown butter goes too dark and smells almost burnt, it's not ruined—it's just deeper, which honestly makes the cookies more intense and kind of better. If you forget to chill the dough and bake straight from room temperature, you'll get thinner, crisper cookies that are still delicious, just different. The one thing you truly can't recover from is overmixing the dough, which turns them into tough, dense little pucks that taste more like bread than cookies. If you catch yourself mixing past the point where the flour is just combined, stop immediately—those extra 20 seconds of stirring genuinely matter.
- Brown butter that's slightly darker than deep gold adds complexity; butter that smells burnt is over the line, so start paying attention around the 6-minute mark.
- If your cookies spread too thin, chill the remaining dough longer next time or increase your oven temperature by 25°F to set the edges faster.
- Miso paste that hasn't been whisked smooth will create little pockets of intense flavor; take an extra 30 seconds to make sure it's fully incorporated.
 Pin It
 These cookies taste best the day after they're baked, when all those flavors have settled into each other and the texture reaches its ideal state. Serve them with cold milk, green tea, or nothing at all, and watch people discover a whole new way to feel about dessert.
Recipe Q&A
- → What does browning the butter add?
Browned butter adds a deep, nutty aroma and enhances the cookie's caramel flavor profile.
- → Why use white miso in these cookies?
White miso introduces a subtle savory-sweet depth that balances the caramel notes without overpowering.
- → How does chilling the dough affect the cookies?
Chilling firms the dough, intensifies flavors, and helps achieve a chewier texture upon baking.
- → Can I substitute the chocolate chips?
Yes, using milk chocolate or chopped toasted nuts offers delightful variations in flavor and texture.
- → What’s the purpose of flaky sea salt topping?
Flaky sea salt adds a contrasting burst of saltiness, which enhances the rich caramel and miso flavors.